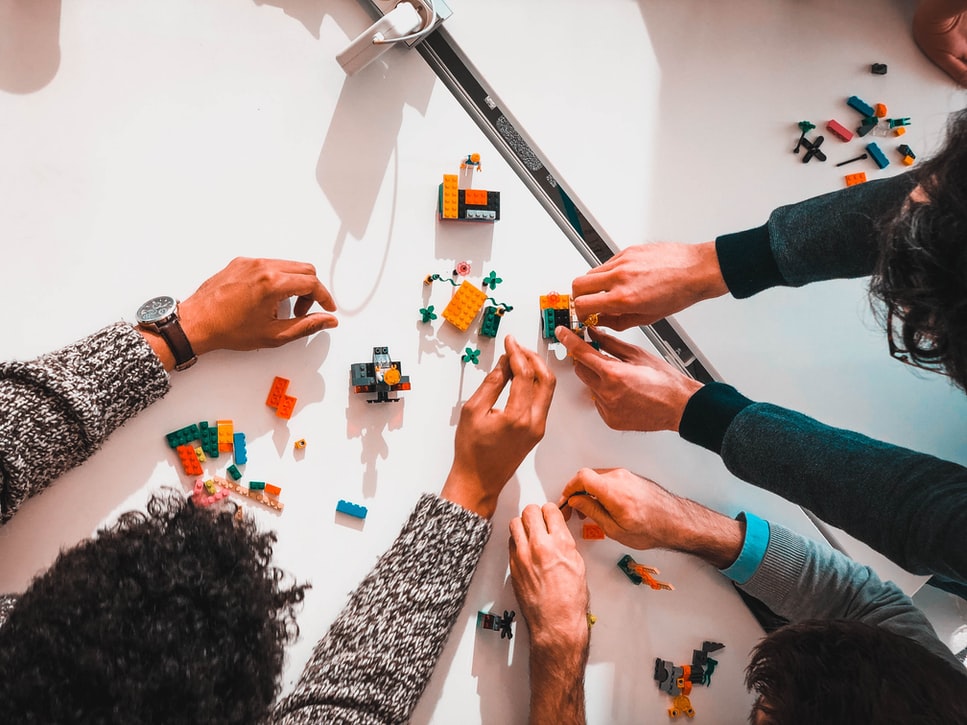
What is rapid prototyping? Why would you want to rapid prototype? Rapid prototyping is the ability to prototype user interactions rapidly, quickly user test them and iterate based on feedback and learnings. You’d want to rapid prototype due to constraints such as cost, time, effort.
Additionally, you’d want to gain critical customer feedback early rather than learn late. This feedback determines the direction for the design of your product and service, saves a great deal of time and effort, minimizes surprises and improves the probability of delivering usable product and service.
The matrix below outlines the different rapid prototyping techniques against cost, fidelity, level of interaction.
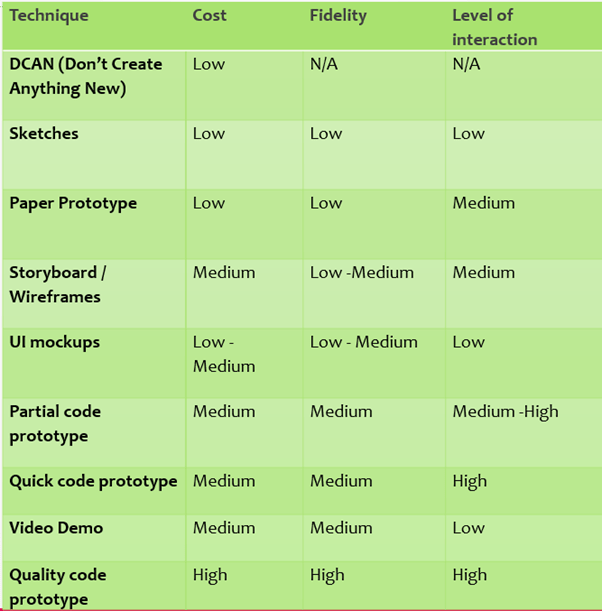
What is fidelity ?
Fidelity means the degree of exactness with which something is created. For example, the degree of exactness for quality code prototype is much higher relative to paper prototype.
What is level of interaction ?
When you user test your prototype, the level of interaction for different types of prototypes is different. For example, the level of interaction user would have with a sketch is lower relative to the one with quality code prototype.
Now that you understand the definitions, let’s evaluate each prototyping technique with respect to these parameters.
DCAN (Don’t Create Anything New)
Why fix if it ain’t broken? If the site or app you’ve developed rates high in usability and user satisfaction, you may choose not to create anything new. Creating anything new requires time, effort, cost.
Having said that, it’s pretty rare you may choose this option. Technology is changing rapidly. It’s a highly competitive world. Users are demanding more for less. Therefore, you may still update your site or app even if it rates high in usability and user satisfaction. That’s where you will choose one or more of rapid prototyping techniques described in the matrix.
Sketches
Sketches are the quickest and least expensive. It can be drawing on paper or whiteboard, etc. It provides an opportunity to quickly illustrate an idea. It doesn’t have much interaction. The fidelity of the experience is low. It can be used to scout major directions of certain experience and conduct comparison study among drastically different choices at very early stage of a project. It can also be used to explore different interaction designs. Drawing sketches is a simple way to get quick feedback and discuss ideas within the team. Showing those sketches to limited number of users can help the team quickly understand the pros and cons of each option.
Sketching is the fastest way to capture the ideas. You don’t have to be really great at sketching, because you and the client are talking the same thing. Sketching while talking can also capture interactions, like you draw an arrow and say “This icon flies there“. You can refer back to these sketches to recall what you discussed. Not to mention, it’s cool 😊
Conventional sketching has an important place in design. Even those without a great deal of natural talent can improve their sketching skills with practice. There are a range of techniques and technologies that can be used to create images that serve sketch-like purpose.
The limiting factor is your imagination, not technology or technique. There is always a way to express an idea appropriately within your means. – Rauschenberg

Anatomy of Sketch
What attributes define the anatomy of a sketch? Let’s look at them.
| Quick | A sketch is quick to make |
| Timely | A sketch can be provided when needed |
| Disposable | If you can’t afford to throw it away when done, it’s probably not a sketch The investment in a sketch is in the concept, not the execution The value of a sketch largely depends on its disposability |
| Plentiful | Sketches do not exist in isolation Their relevance is in the context of a series, not an isolated rendering |
| Clear Vocabulary | The style in which a sketch is rendered follows certain conventions that distinguish it from other types of renderings |
| Distinct Gesture | A sketch is fluid and open unlike an engineering drawing, for example |
| Minimal Detail | Include only what is required to render the intended purpose or concept Superfluous detail is distracting |
| Appropriate degree of refinement | A sketch should not suggest a level of refinement beyond that of the project being depicted |
| Suggest and explore rather than confirm | Sketches suggest, don’t tell Their value is to provide a catalyst to desired behavior, conversation, interaction |
| Ambiguity | Sketch is intentionally ambiguous Much of its value is derived from being able to interpret in different ways |
The notion of visual vocabulary, resolution and refinement is significant. Sketches must be different from other types of renderings. A sketch is incomplete, vague, low fidelity representation. The degree of fidelity must match its purpose. A sketch should have just enough fidelity for the current stage. Too little fidelity makes the argument unclear. Some serious problems occur if the stakeholders view the sketches as final product. The aforementioned list of attributes is also like a sketch – tentative with room for improvement. A sketch is a conversation between mind and sketch. A sketch is created from current knowledge. Reading or interpreting the resulting representation creates new knowledge. This new knowledge feeds back into the mind. Creating opportunity to update the sketch.
Sketch to Prototype
Is sketch another word for low fidelity prototype ? Not exactly. Both sketch and prototype are instantiation of design concept. However, they serve different purposes. Therefore, they are concentrated in different phases of the design process. Sketches dominate the early ideation stages. Prototypes are concerned at later stages. Much of this has to do with the related attributes of cost, timeline, quantity, disposability. Building a prototype costs more than building a sketch. Hence, there are fewer prototypes, they are less disposable, they take longer to build. Sketching dominates the process when there are lots of different concepts to explore and things are still uncertain. Sketch to prototype is a continuum. It’s not an either/or proposition. This signifies the front-end of the process must be managed differently than the back-end. Manage the sketching phase differently than the prototyping phase. Since investment in sketching is low, it’s an opportunity to explore options at the start and realize high return on investment. It’s an opportunity to fail early and fail often at low cost. This can help avoid the consequences of an undetected bad decision or an opportunity missed that can cost you the most. When uncertainties are high, keep the stakes low. As uncertainties reduce, increase the stakes.

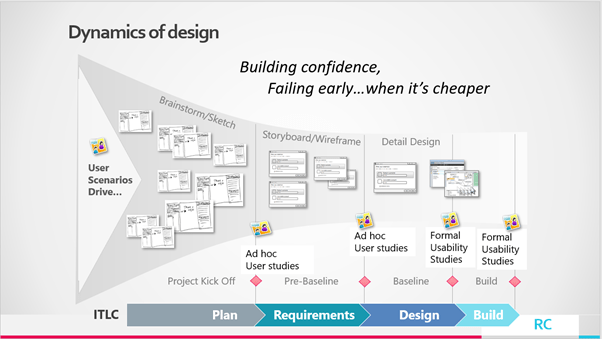
Dynamics of Design
The design funnel begins with ideation and ends with usability testing. Ideation is largely dominated by sketching. This enables ideas to be explored quickly and cheaply. More refined and expensive prototypes provide the basis for testing at later stages of design. The most dominant artefacts are more refined and expensive prototypes. As you progress, the overall investment in the process grows. You don’t manage ideation the same way as usability. Involve users throughout the iterative process, not just during usability testing.
Paper Prototype
Paper prototype is built on top of sketches. It’s a set of paper sketches being put together to offer the interaction for a specific scenario. The fidelity is the same as sketches. With the interactions, teams can get feedback on whether users get what this is about (the core) or whether the experience can effectively enable the scenario. The paper is to emulate the screen or a Window. Users can use their finger or a pencil to emulate mouse clicks, etc. Notice in the picture below, multiple layers of paper sketches are used to simulate the interactivity. Those layers can be used to simulate choices and UI changes. Those layers can be put together by using sticky notes, paper clips, etc.

UI Mockup
UI mock-up is the equivalent of sketches in digital format. It’s generally more costly to create compared to sketches due to the learning curve to use certain tools and limitation of tools functionalities. For example, people need to know how to use Visio, PowerPoint, Photoshop, etc. to create such a UI mock-up. Some latest tools for UI design are making this easier, such as Blend and Balsamiq. This might have higher fidelity compared to sketches.

Partial Code Prototype
With the latest tool, you can create a prototype with mostly UI mock-up, but sprinkle enough code around it to make it very interactive. Blend 3 is an amazing tool for this. It offers a special UI style named Sketch. Using this style, the UI controls have the sketchy look and feel, such as the one below. This can be a clear indication to users that this is just a prototype.
Blend 3 supports “behavior” which is basically re-usable interactivity that can be applied to any element on your art board with drag and drop. Behaviors can be used for simple things, such as opening and closing dialogs, running animations, setting properties, validating input or navigating between screens. Behaviors also can be used for more complex interaction such as making objects drag-able in a container. The transitions from UI to UI can be enabled easily through the tool. It also supports binding to sample data to enable the scenario that requires data. All those can be done without any code. We can also plug in some code through triggers and actions to enable extra interaction if it’s critical to the experiment.

Quick Code Prototype
Code prototype is generally more expensive than all the things mentioned above, but it’s real. Many concepts need to be used by users for extended period of time to experience the value, such as communication tools, social apps, etc. There are also applications that deal with very personalized data, such as document, friends list, emails, and the relevance of the data is critical. For those applications, only the code prototype with real data can provide the adequate experience to people to test it out. It’s hard to identify when to switch from non-code prototype to code prototype. Our experience is after 2 or 3 iterations of paper prototype, it starts to make sense to put the learning into code. Another sign to switch to code is the amount of feedback from other practice starts to taper. Quick and dirty code prototype carries this negative feeling because developers always want to be proud of their code. But under this context, it isn’t worth the cost because you are not sure about the design yet, you are not sure about the technology choice yet, and you are not sure about the architecture yet.

One of our teams did a 30-prototypes-in-30-business-day exercise. It’s all quick and dirty code, but the team learned a lot about the design and the technology feasibility. It started with a list of possible technologies paired with likely scenarios resulted from a day of brainstorm. Each developer picked from the list, took no more than 4 days to develop a single prototype. The moment a scenario was achieved, the prototype was done. The developer recorded the learning from the prototype, checked in the code, noted the dependencies, moved on to the next one. All the prototypes were demo’ed to other people to gather feedback.
Quality Code Prototype
Once you identify the core idea, you are ready to go deep into to perform an in-depth experiment, collect real usage data over extended period of time, you’ll need to develop a high quality code prototype. The quality needs to be high enough so that the target end users can use it daily if necessary. The performance, stability and features need to be good enough to have thousands of people using it. This is the most expensive prototype. It could cost 2-6 people 6-12 months to do a thorough study. It’s similar to the beta of a startup product. Most quality engineering practices apply here.
Video Demo
Video demo is a great way to get feedback at the early stage of the design because you probably don’t know what features you should implement, or haven’t implemented much code yet, or the code is not stable enough to use. Video demo is also less demanding on time from the user perspective. If the user has to install something, play with it and then provide feedback, that’s at least 15-30 minutes of work. He or she would also worry about whether this code will mess up the machine. Video can show the experience in 3-5 minutes. One day we sent out links to both the video and the download page of the real code. Only 2 persons installed the build and none of the two provided input, but about a dozen people watched the video and provided valuable feedback.
What has most value
At Microsoft Engineering India, I helped establish quarterly cadence for Design-A-Thon, a cross-functional 3-day collaboration to move from idea to prototype, fast.
| Day 1 | Day 2 | Day 3 |
| Project Teams & Design Rangers Meet & Greet | Affinity Diagramming (translate research into design) | Storyboarding and rapid prototyping (cont’d) |
| Clarify Roles & Responsibilities | Storyboarding and rapid prototyping | Conduct or simulate usability testing |
| Determine the need for user research | Present your projects and share feedback | |
| Conduct or simulate Contextual Inquiry (CI) | ||
| Analyze and summarize learnings from CI |
3 days with passion and enthusiasm … 3 days spent in conversation in the presence of PM, Dev, Test, Designers, Service Engineering, Security, Leaders from across Microsoft Engineering India … 3 days of sharing ideas … it is such a joy to converse.
Design-A-Thon aims to enable project team members collaborate together with the goal of delighting the customers of their applications by improving the end user experience. Held at the Collab Lab, the 3-day Design-A-Thon saw 12 enthusiastic project teams collaborate and build with guidance from 16 design rangers leading to a total of 103 participants.
The motto for Design-A-Thon was ‘Good design begins with honesty, asking tough questions and comes from collaboration and from getting into user’s shoes’. At the end of 3 days, we achieved what otherwise would have taken more than a month. I helped institutionalize design thinking across 7 business units with the goal of improving usability of the applications by 20 – 50%.
Read more about how to solve the most pressing problems for your customers
How do you engage with your users ?
How do you measure if the products and services meet the stated and unstated needs of your users ?
Do share in the comments!
Like this article ? How about giving it a like and share ? Thank you!
